Nothing beats the joy of enjoying a cool, refreshing dessert during those warm summer days, especially when it’s conveniently served in a cone! Introducing my Strawberry Crunch Cheesecake Cones—a delightful twist on traditional cheesecake that combines creamy filling, vibrant strawberries, and a satisfying crunch. These cones are perfect for summer parties, allowing you to serve up a visually stunning treat that your friends and family will rave about. Plus, they’re super easy to assemble, making them a fantastic option for those last-minute gatherings. So, are you ready to impress your guests and dig into these deliciously fun cones? Let’s get started!

Why are These Cheesecake Cones a Must-Try?
Delightful Presentation: These cones transform classic cheesecake into a visually stunning dessert that will have your guests reaching for more.
Easy Assembly: With simple layering of easy ingredients, you can whip these up in no time—whether it’s a summer barbecue or a birthday party.
Bursting with Flavor: The sweet, tangy strawberry sauce perfectly complements the creaminess of the cheesecake, creating a tantalizing flavor explosion.
Versatile Options: Feel free to switch up the fruit or use chocolate cones for a fun twist! For more fruity inspirations, check out these Pumpkin Pie Cheesecake or delicious Strawberry Honey Custard ideas.
Crowd-Pleasing Treat: Easy to love, these cones are guaranteed to delight friends and family alike, making every occasion feel special.
Strawberry Crunch Cheesecake Cone Ingredients
• Create this delightful treat with simple ingredients!
For the Strawberry Sauce
- Strawberries – Fresh strawberries can be used instead of freeze-dried for a juicier sauce.
- Granulated Sugar – Sweetens the sauce and enhances the strawberry flavor.
For the Cheesecake Filling
- Cream Cheese – Ensure it’s softened completely to avoid lumps in your filling.
- Granulated Sugar – Adds sweetness to the creamy cheesecake mixture; powdered sugar can be used for a smoother texture.
- Whipped Cream – Whip until stiff peaks form; avoid over-whipping for a creamy texture.
- Vanilla Extract – For an extra layer of flavor, consider adding a splash to the filling.
For the Crunch Topping
- Vanilla Wafer Cookies – Create the crunchy topping; lightly toast for extra flavor.
For Assembling
- Waffle Cones – Perfect vessels to hold your mouthwatering cheesecake filling and toppings.
Step‑by‑Step Instructions for Strawberry Crunch Cheesecake Cones
Step 1: Make Strawberry Sauce
Begin by combining fresh or freeze-dried strawberries with granulated sugar in a saucepan over medium heat. Stir frequently as the mixture bubbles and thickens, about 8–10 minutes, until it reaches a syrupy consistency. Remove from heat and let the strawberry sauce cool completely before using it in your Strawberry Crunch Cheesecake Cones.
Step 2: Prepare Cheesecake Filling
In a mixing bowl, beat softened cream cheese using an electric mixer until it becomes smooth and creamy. Gradually add granulated sugar, continuing to beat until well incorporated. Gently fold in whipped cream until the mixture is light and fluffy, ensuring not to over-mix. This cheesecake filling will create a rich layer in your Strawberry Crunch Cheesecake Cones.
Step 3: Assemble Cones
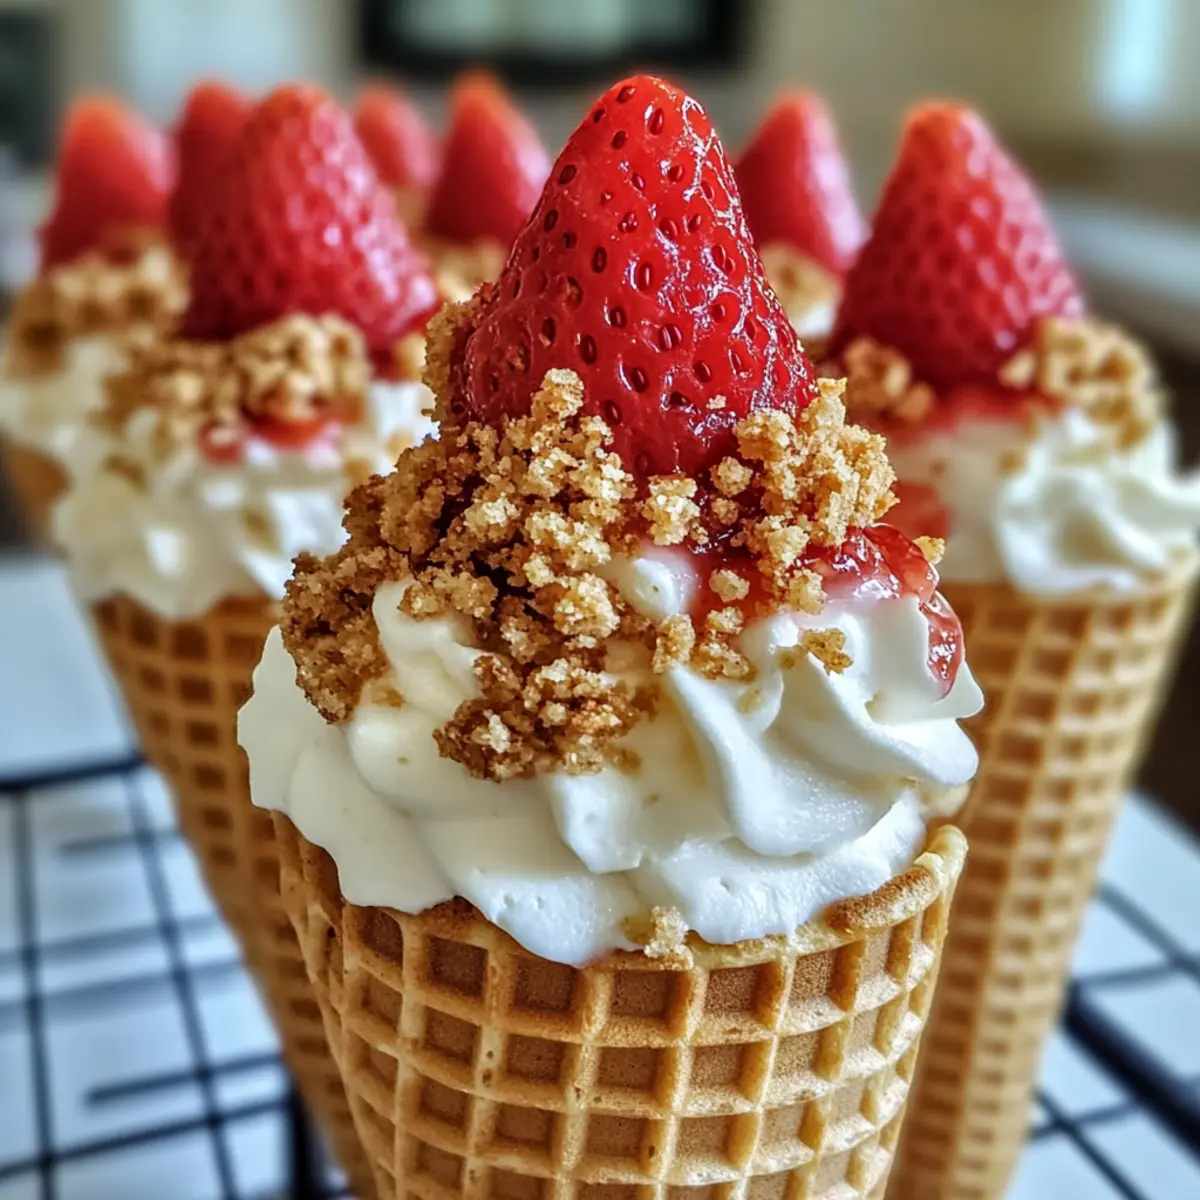
Take the waffle cones and start filling them generously with the creamy cheesecake filling using a piping bag or a small spoon. Make sure to fill them to the top for a delightful presentation. Drizzle the cooled strawberry sauce over the filled cones, allowing it to cascade down the sides. This adds a beautiful layer of flavor to your Strawberry Crunch Cheesecake Cones.
Step 4: Add Crunch Topping
While the cones are filled, take toasted vanilla wafer cookies and crush them into small pieces. Gently sprinkle the crushed cookies over the top of the filled cones, creating a delightful crunchy topping. This adds a wonderful contrast in texture and completes your Strawberry Crunch Cheesecake Cones beautifully.
Step 5: Chill
Place the assembled Strawberry Crunch Cheesecake Cones in the refrigerator for at least 1 hour. This chilling time allows the flavors to meld and the cheesecake filling to set, making it easier to enjoy without making a mess. Once chilled, they are ready to serve at your next summer gathering!

Expert Tips for Strawberry Crunch Cheesecake Cones
- Room Temperature Cream Cheese: Make sure your cream cheese is fully softened to room temperature to ensure a smooth and lump-free cheesecake filling.
- Whipping Precision: Whip the heavy cream until just stiff peaks form; over-whipping can cause it to become grainy and lose its creamy texture in the cheesecake cones.
- Cooling the Sauce: Always let the strawberry sauce cool completely before adding it to your cones. This prevents it from melting the cheesecake filling and maintains the structure.
- Flavor Variations: Don’t hesitate to experiment! You can swap the strawberry sauce for other fruit flavors like raspberry or blueberry to create your twist on the Strawberry Crunch Cheesecake Cones.
- Preventing Sogginess: To keep your cones crispy, assemble them right before serving. If prepared in advance, store the filling and sauce separately and fill the cones just before enjoying.
Make Ahead Options
These Strawberry Crunch Cheesecake Cones are perfect for meal prep, saving you time for those busy summer days! You can prepare the strawberry sauce and cheesecake filling up to 24 hours in advance; simply refrigerate them in airtight containers to maintain their flavors and textures. When you’re ready to serve, just assemble the cones by filling them with the cheesecake mixture and drizzling the strawberry sauce over the top. For the crunch topping, crush the toasted vanilla wafers and sprinkle them just before serving to keep that addictive crunch intact. With these make-ahead tips, you’ll have a stunning dessert ready to wow your guests with minimal last-minute effort!
Strawberry Crunch Cheesecake Cones Variations
Feel free to let your creativity shine with these scrumptious twists on Strawberry Crunch Cheesecake Cones!
-
Raspberry Sauce: Swap strawberry sauce for raspberry for a tart, tangy twist that complements the creamy filling beautifully.
-
Coconut Whipped Cream: Use coconut cream instead of regular whipped cream for a tropical flair that transports your taste buds to paradise.
-
Chocolate Waffle Cones: Try chocolate waffle cones instead of traditional ones, adding a rich depth of flavor and a delightful surprise with every bite.
-
No-Bake Option: For a more straightforward version, skip the cone altogether and layer the cheesecake filling, sauce, and crushed cookies in a jar for a charming dessert parfait.
-
Peach or Mango: Substitute fresh strawberries with chopped peaches or mangoes for a juicy summer sensation that sings of sunshine.
-
Nutty Crunch: Incorporate crushed nuts, like almonds or pecans, into the topping for a hearty crunch that pairs wonderfully with the smooth cheesecake.
-
Spicy Kick: Add a dash of cayenne or chili powder to your strawberry sauce for a spicy finish that elevates the sweet flavors and tantalizes your palate.
-
Cinnamon Sugar Dusting: Before serving, sprinkle a dash of cinnamon-sugar over the filled cones to introduce a warm, comforting flavor that enhances the overall experience.
These delightful variations not only give you the freedom to tailor your dessert to your taste but also make your gatherings more exciting! If you’re looking for more dessert inspiration, try the equally delightful Pumpkin Pie Cheesecake or indulge in the rich flavors of Strawberry Honey Custard.
How to Store and Freeze Strawberry Crunch Cheesecake Cones
Fridge: Store leftover cones in an airtight container for up to 2 days. To maintain the crunchiness, keep the filling and strawberry sauce separate until ready to enjoy.
Freezer: For longer storage, freeze the cheesecake filling in an airtight container for up to 1 month. Assemble the cones fresh just before serving to preserve the texture.
Reheating: If the cheesecake filling has been refrigerated, allow it to sit at room temperature for about 15 minutes before assembling the cones. This ensures a smooth, creamy texture.
What to Serve with Strawberry Crunch Cheesecake Cones?
Elevate your dessert experience by pairing these delightful cones with complementary flavors and textures that will leave your guests enchanted.
-
Fresh Fruit Salad: A mix of seasonal fruits adds a refreshing crunch and balances the creamy cheesecake with its natural sweetness.
-
Minty Iced Tea: This cool, herbal drink offers a refreshing contrast and enhances the fruity notes of the strawberry sauce. Perfect for summer gatherings!
-
Chocolate Drizzled Strawberries: Rich chocolate pairs beautifully with cheesecake and brings an indulgent twist to your dessert table.
-
Lemon Sorbet: The tartness of lemon sorbet creates a bright contrast to the creamy cheesecake, providing a palate-cleansing experience.
-
Almond Biscotti: These crunchy cookies are perfect for dipping and add a nutty flavor, complementing the soft texture of the cheesecake cones.
-
Whipped Cream with a Twist: Add a hint of vanilla or almond extract to your whipped cream for an extra layer of flavor that enhances the overall dessert experience.
-
Sparkling Rosé: A glass of bubbly rosé offers a light effervescence that pairs wonderfully with the sweetness of the cones, making each bite feel special.
-
Chocolate Sauce: A drizzle of rich chocolate sauce enhances the dessert, making each cone even more decadent.

Strawberry Crunch Cheesecake Cones Recipe FAQs
How do I select ripe strawberries for the sauce?
Absolutely! When choosing strawberries, look for berries that are bright red, firm, and plump. Avoid any with dark spots or signs of mold. A sweet aroma is also a great indicator of ripeness—go for the ones that smell like summer!
What’s the best way to store leftover cheesecake cones?
Very! Store leftover Strawberry Crunch Cheesecake Cones in an airtight container in the refrigerator for up to 2 days. To keep the cones crunchy, it’s best to store the filling and strawberry sauce separately and only assemble them just before serving.
Can I freeze the cheesecake filling?
Yes, indeed! You can freeze the cheesecake filling in an airtight container for up to 1 month. When you’re ready to enjoy it, let it thaw in the fridge overnight before using. For the best texture, prepare the cones fresh just before serving.
What should I do if my cheesecake filling is too lumpy?
Oh no! If your filling has lumps, don’t despair. You can fix this by beating the mixture again with an electric mixer until smooth. If you find it’s still chunky, try passing it through a fine mesh strainer to ensure a silky texture. Patience is key, and you’ll achieve that perfect creaminess!
Can I make these cheesecake cones ahead of time?
Definitely! I often prepare the strawberry sauce and cheesecake filling a day in advance. Just keep them stored in separate airtight containers in the refrigerator. Assemble the cones shortly before serving to retain that delightful crunchiness!
Are there any allergy considerations with this recipe?
Absolutely! This recipe contains dairy, specifically cream cheese and whipped cream, which may not be suitable for those with lactose intolerance or dairy allergies. Always check labels and consider alternatives like dairy-free cream cheese or coconut whipped cream if needed. Enjoy with care!
Strawberry Crunch Cheesecake Cones
Ingredients
Equipment
Method
- Make Strawberry Sauce by combining strawberries and sugar in a saucepan over medium heat. Stir frequently until thickened, about 8-10 minutes. Let cool.
- Prepare Cheesecake Filling by beating cream cheese until smooth, adding sugar gradually, then folding in whipped cream until fluffy.
- Assemble Cones by filling waffle cones with cheesecake filling using a piping bag. Drizzle cooled strawberry sauce over the filled cones.
- Add Crunch Topping by crushing vanilla wafer cookies and sprinkling on top of the filled cones.
- Chill the assembled cones in the refrigerator for at least 1 hour before serving.
Leave a Reply