The delicious aroma of spices wafting through my kitchen always brings a smile to my face, especially when I’m preparing my family’s favorite – Cheesy Taco Braid Beef. This dish is like a fiesta in every bite, combining savory beef with melty cheese, all wrapped in an impressive braided crust. With minimal prep time and a fun, customizable twist, it’s become our go-to for easy weeknight dinners. Whether we’re looking to surprise the kids or keep things fresh, this recipe adapts beautifully to suit any dietary preference – ground turkey or a tasty vegetarian option work perfectly. Ready to indulge in a homemade masterpiece that will leave everyone asking for seconds? Let’s dive in!
Why is Cheesy Taco Braid Beef a Must-Try?
Flavorful Fusion: Experience the delightful mélange of savory beef and gooey cheese, all braided into a delicious package.
Easy to Make: With simple ingredients and straightforward steps, this recipe is perfect even for those new to the kitchen.
Customizable Delight: Feel free to use ground turkey or even a veggie alternative for a meal that satisfies everyone at the table! From Ranch Beef Bowtie to the comforting Jalapeno Popper Beef, the variations are endless.
Impressive Presentation: The braided shape looks fancy but is surprisingly easy to achieve, making it perfect for impressing guests.
Family Approved: Kids love the fun shape, and with tasty toppings like sour cream and avocado, it’s a guaranteed crowd-pleaser!
Cheesy Taco Braid Beef Ingredients
For the Filling
• Ground Beef – Provides that hearty, meaty flavor; feel free to swap with ground turkey for a healthier twist.
• Salsa – Adds a zesty kick; consider using fresh salsa for an added punch of flavor.
• Taco Seasoning – Gives the filling classic taco taste; homemade mixes can elevate the flavor even more.
• Water – Helps to thicken the beef mixture for the perfect consistency.
For the Braid
• Pizza Dough – Forms the delicious braid; store-bought makes this recipe a breeze.
• Shredded Cheddar Cheese – Melts beautifully inside; try Monterey Jack for a milder flavor.
• Egg – Provides a shiny glaze for that golden finish; substitute with milk if you prefer a lighter color.
Optional Additions
• Vegetables – Chopped bell peppers or corn boost nutrition and add extra flavor; sneak in those veggies!
• Black Beans – A fantastic vegetarian option to replace the meat; they add fiber and protein.
• Spicy Cheese – Swap cheddar for pepper jack to spice things up!
Dive into making your Cheesy Taco Braid Beef, and don’t hesitate to get creative with the fillings!
Step‑by‑Step Instructions for Cheesy Taco Braid Beef
Step 1: Preheat the Oven
Start by preheating your oven to 350°F (175°C). This ensures that your Cheesy Taco Braid Beef bakes evenly and achieves that golden brown finish you desire. A properly heated oven is crucial for achieving a crispy crust that complements the gooey cheese and savory beef within.
Step 2: Prepare Baking Sheet
While the oven is heating, line a baking sheet with parchment paper. This will help prevent your Cheesy Taco Braid Beef from sticking and make cleanup a breeze. Arrange the parchment flat on the pan, leaving some overhang for easy lifting later.
Step 3: Cook Beef
In a large skillet over medium heat, add your ground beef and cook until browned and fully cooked, about 7-10 minutes. Make sure to stir occasionally and break it up with a wooden spoon. Once browned, drain any excess grease, allowing the savory flavor of the beef to shine through in your braid.
Step 4: Add Flavors
Reduce the heat to low and stir in your salsa, taco seasoning, and water to the cooked beef mixture. Allow it to simmer for about 5 minutes, stirring occasionally, until the mixture thickens and combines beautifully. The fragrant aroma will hint at the deliciousness to come in your Cheesy Taco Braid Beef.
Step 5: Prep Dough
Unroll your pizza dough onto a lightly floured surface or directly onto the prepared parchment on your baking sheet. Roll it out into a rectangle, about 12×15 inches, ensuring it’s even so that it bakes thoroughly. Visualize a canvas of delicious possibilities as you prepare for the folding and braiding step.
Step 6: Add Fillings
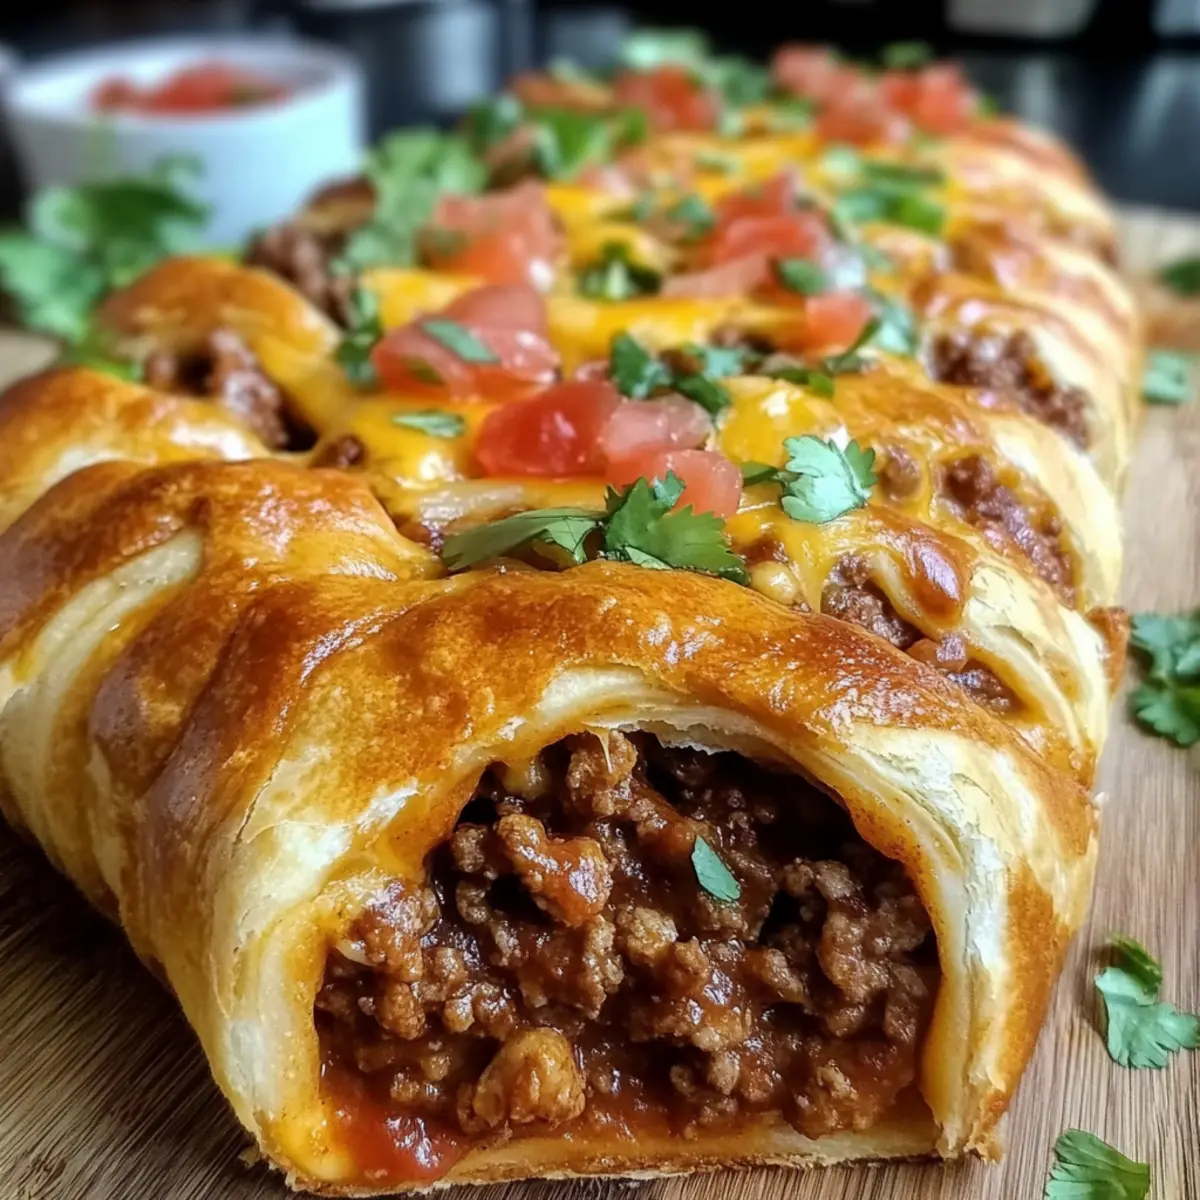
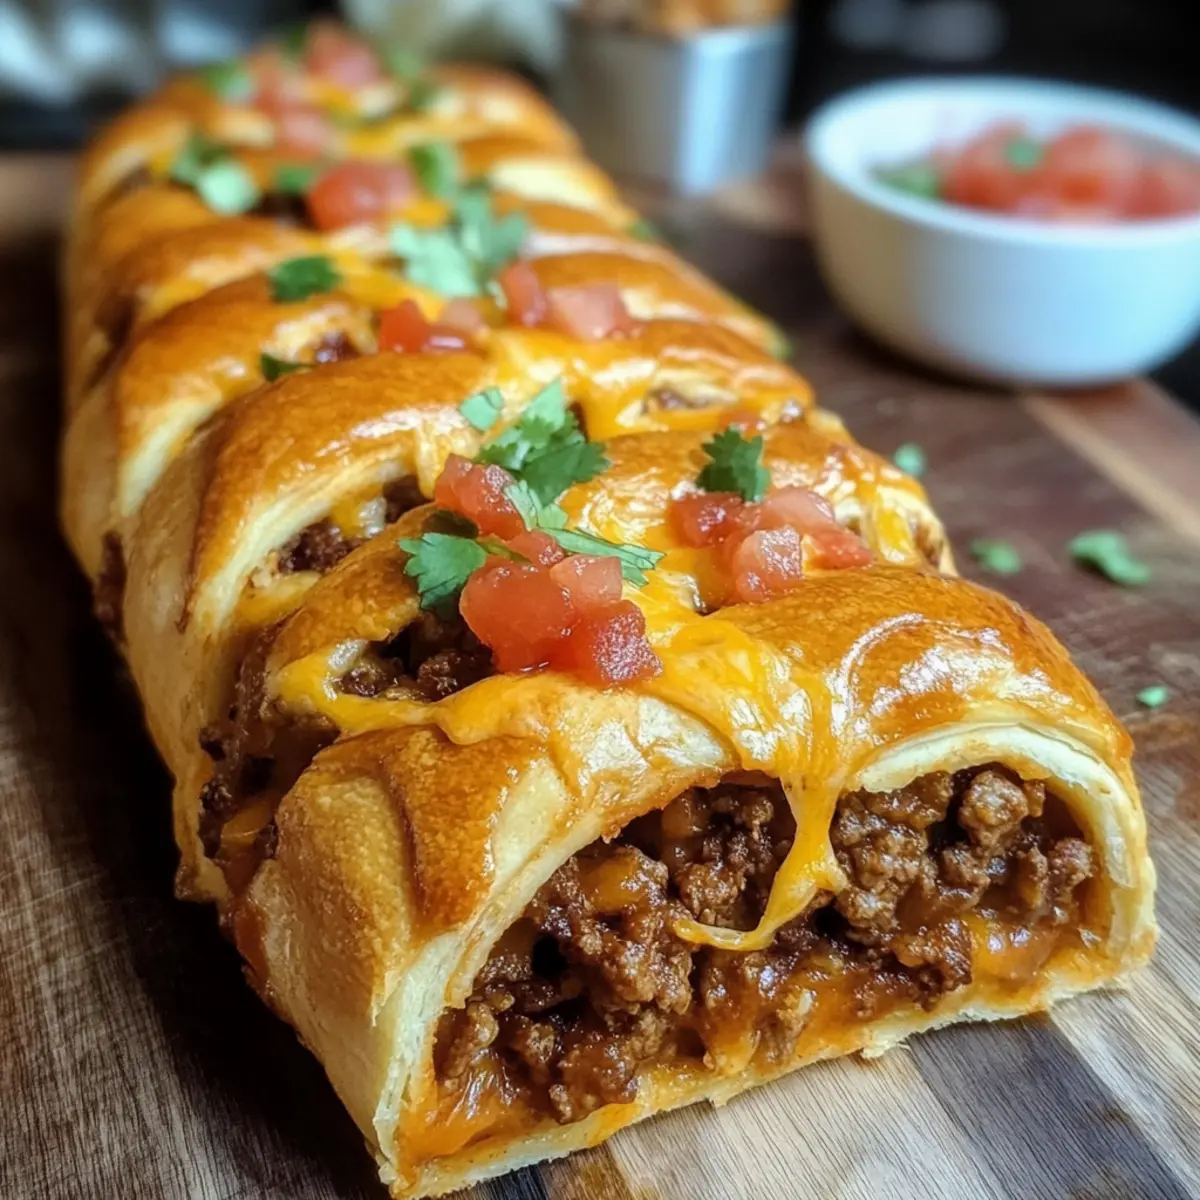
Sprinkle a generous layer of shredded cheddar cheese down the center of the rolled pizza dough. Spoon the flavorful beef mixture evenly over the cheese, and add another layer of cheese on top to ensure maximum gooeyness. This is where your Cheesy Taco Braid Beef starts to take shape and promise delicious bites.
Step 7: Create Braids
Using a sharp pizza cutter or knife, slice strips along the sides of the dough, about 1 inch wide. Begin folding the dough strips over the filling, alternating from one side to the other to form a beautiful braid. Be sure to pinch the ends to seal the filling inside, creating a stunning centerpiece.
Step 8: Glaze
In a small bowl, whisk together the egg and a splash of water until combined. Brush this mixture generously over the top of your braid to achieve that shiny, golden glaze when baked. The glaze not only enhances the appearance but also adds a delightful texture to your Cheesy Taco Braid Beef.
Step 9: Bake
Carefully place the baking sheet in the preheated oven and bake for 22-25 minutes. Keep an eye on the braid, looking for a beautifully golden brown top and a bubbly filling inside. The aroma wafting through your kitchen will keep everyone eagerly awaiting the moment they can dig in.
Step 10: Cool & Serve
Once baked, remove your Cheesy Taco Braid Beef from the oven and let it cool for a few minutes on the baking sheet. This will make slicing easier and prevent any steaming burns. Serve warm, perhaps alongside toppings of shredded lettuce, diced tomatoes, and a drizzle of sour cream to elevate this delightful dish!

Make Ahead Options
These Cheesy Taco Braid Beef are perfect for busy home cooks looking to save time during the week! You can prepare the filling, including the beef and salsa, up to 24 hours in advance; just store it in an airtight container in the refrigerator. To keep the dough fresh, it’s best to assemble the braid right before baking. Alternatively, you can braid it and refrigerate for a few hours before popping it in the oven. When you’re ready to enjoy your delicious Cheesy Taco Braid Beef, simply bake it directly from the fridge, adding a few extra minutes to ensure it’s heated through. This way, you’ll have an effortless meal that’s just as delicious as if you made it fresh!
What to Serve with Cheesy Taco Braid Beef?
Elevate your dining experience with delightful sides that complement the comforting flavors of this family favorite.
- Crispy Salad: A fresh green salad with a zesty vinaigrette brightens the meal, providing contrast to the cheesy braid. Toss in crunchy cucumbers and ripe tomatoes for extra flavor!
- Guacamole: Creamy guacamole adds a rich, buttery texture that perfectly balances the savory beef and cheese in the braid, enhancing every bite.
- Spanish Rice: Aromatic Spanish rice offers a wonderful contrast with its mild spices, making it a comforting side that completes the taco theme beautifully.
- Refried Beans: Creamy refried beans not only add fiber but also a deliciously rich taste that pairs well with the bold flavors of the Cheesy Taco Braid Beef.
- Corn on the Cob: Sweet, buttery corn on the cob brings a delightful crunch to your meal and pairs seamlessly with taco-inspired dishes. Grilled or boiled, it’s always a hit!
- Tropical Fruit Salad: A vibrant mixture of pineapple, mango, and berries provides a refreshing sweetness that balances the savory components, making for a delightful contrast.
- Pico de Gallo: Fresh pico de gallo with tomatoes, onion, and cilantro adds a burst of freshness and a tangy kick that elevates the overall experience.
- Chips and Salsa: Crunchy tortilla chips with your favorite salsa make for a fun appetizer that keeps everyone snacking while the braid bakes!
- Margueritas: A zesty margarita brings a refreshing twist and the perfect citrusy brightness to accompany your Cheesy Taco Braid Beef, making it feel festive.
- Chocolate Flan: For dessert, a silky chocolate flan offers a luscious finish, contrasting with the savory dinner and leaving your guests with sweet memories.
Cheesy Taco Braid Beef Variations
Feel free to get creative and customize this recipe to suit your tastes and dietary needs!
- Ground Turkey: Substitute ground beef with ground turkey for a lighter, leaner meal that still packs a punch of flavor.
- Vegetarian Delight: Use black beans or lentils instead of meat for a tasty and protein-rich vegetarian option. These alternatives add hearty texture and flavor, making everyone at the table happy.
- Spicy Twist: Swap cheddar for pepper jack cheese to give your braid a spicy kick. This addition brings an exciting heat that will make your taste buds dance.
- Veggie Boost: Toss in chopped bell peppers, corn, or diced jalapeños into the beef mixture for an extra boost of flavor and nutrition. A rainbow of veggies not only brightens the dish but also adds a fun twist!
- Salsa Variety: Experiment with different types of salsa, like corn salsa or peach salsa, to change up the flavor profile and add a unique twist to each bite. The subtle sweetness of peach salsa can be a delightful surprise!
- Herb Infusion: Add fresh cilantro or chopped green onions to the filling for an aromatic freshness that enhances the taco flavor. These herbs help to lighten the dish and add a burst of color and flavor.
- Crust Alternatives: Try using crescent roll dough or puff pastry instead of pizza dough for a flakier, gourmet version of the braid. The flaky layers add a different texture, keeping it fresh at every dinner!
- Zesty Finishes: After baking, drape a light drizzle of taco sauce or a dollop of guacamole over each slice for that ultimate finishing touch. Garnishing with fresh ingredients elevates the dish and adds an inviting touch.
Whichever variation you choose, this Cheesy Taco Braid Beef is destined to become a family favorite!
Expert Tips for Cheesy Taco Braid Beef
Perfect Consistency: Ensure the beef mixture is not too watery; this will help maintain the integrity of your braid. A thicker filling is key to a successful dish.
Clean Cuts: Use a pizza cutter for precision when cutting the dough strips. This makes the braiding process easier and keeps everything neat.
Egg Wash Benefits: Don’t skip the egg wash—it adds a beautiful golden color and gives the crust a deliciously crisp texture to your Cheesy Taco Braid Beef.
Vegetable Boost: Feel free to add veggies like bell peppers or corn to enhance flavor and nutrition. Just make sure to chop them finely for even cooking!
Make-Ahead Magic: Prepare your braid ahead of time and refrigerate. It saves time on busy nights, and you can bake it fresh when ready to enjoy!
How to Store and Freeze Cheesy Taco Braid Beef
Fridge: Store any leftovers in an airtight container for up to 3 days to maintain freshness and flavor. Reheat in the oven to preserve the crispy texture.
Freezer: Wrap the unbaked braid tightly in plastic wrap, then foil, and freeze for up to 2 months. When ready to enjoy, bake it directly from frozen, adding 5-10 minutes to the cooking time.
Reheating: If reheating a baked braid, cover it with foil in the oven to prevent drying out and warm at 350°F (175°C) for about 15-20 minutes until heated through.
Meal Prep: For a speedy weeknight dinner, prepare the filling ahead of time and refrigerate, then assemble and bake when ready to eat your Cheesy Taco Braid Beef!
Cheesy Taco Braid Beef Recipe FAQs
What is the best way to select ripe ingredients for this recipe?
Absolutely! For the best results, choose fresh ground beef that is bright red with minimal discoloration. When picking salsa, opt for brands with whole ingredients or even better, make your own! Fresh tomatoes, garlic, and onions can elevate your dish. If using vegetables, select firm bell peppers without dark spots.
How should I store leftovers of Cheesy Taco Braid Beef?
Very! Store leftover Cheesy Taco Braid Beef in an airtight container in the fridge for up to 3 days. To reheat, cover it with foil in the oven set at 350°F (175°C) for about 15-20 minutes, ensuring it retains its delicious, crispy crust.
Can I freeze Cheesy Taco Braid Beef, and if so, how?
Of course! To freeze, wrap the unbaked braid tightly in plastic wrap, then cover it with foil. It can be stored in the freezer for up to 2 months. When you’re ready to bake, place it directly from the freezer into a preheated oven, adding an extra 5-10 minutes to the baking time.
What if my beef mixture is too watery?
No worries! If your beef mixture is too watery, simply allow it to simmer for a bit longer, around 5-10 minutes, stirring occasionally, until it thickens. You want your filling to be thick enough to hold up during the braiding process so that it doesn’t seep out during baking.
Are there any dietary considerations for this recipe?
Definitely! You can easily make Cheesy Taco Braid Beef gluten-free by using gluten-free pizza dough. For dairy-free options, substitute the cheese with a dairy-free alternative and skip the egg wash or use a plant-based substitute for the glaze. Always check the packaging for allergens if serving to guests with food sensitivities.
What are some good topping ideas to serve with my Cheesy Taco Braid Beef?
The more the merrier! Enhance your meal by serving it with toppings like shredded lettuce, diced tomatoes, avocado slices, and a drizzle of sour cream or taco sauce. A sprinkle of cilantro or jalapeños can also add a fresh kick!

Cheesy Taco Braid Beef: Your New Family Favorite Dish
Ingredients
Equipment
Method
- Preheat the oven to 350°F (175°C).
- Line a baking sheet with parchment paper.
- In a large skillet, cook ground beef over medium heat until browned, about 7-10 minutes.
- Stir in salsa, taco seasoning, and water; simmer for 5 minutes until thickened.
- Unroll pizza dough on a floured surface, roll into a rectangle about 12x15 inches.
- Sprinkle cheddar cheese down the center of the dough, add beef mixture, and top with more cheese.
- Cut 1-inch strips on each side of the dough and fold them over the filling to create a braid.
- Whisk together the egg and a splash of water and brush over the braid.
- Bake for 22-25 minutes until golden brown and bubbly.
- Let cool for 10 minutes before slicing; serve warm with toppings.
Leave a Reply