The tantalizing sound of a sizzling skillet fills the air, and I’m instantly transported to a sun-drenched kitchen filled with laughter and the mouthwatering aroma of spices. That’s the magic of my Crispy Baked Beef Tacos, a beloved dish that whisks me back to cozy family dinners. This recipe is a lifesaver when weeknights get hectic, combining six simple ingredients ready in just 35 minutes for delicious, easy meals. Not only do they satisfy your cravings for Tex-Mex, but these tacos also bring joy to dinner tables, perfect for dipping into salsa or creamy guacamole. Who could resist such an inviting dish? Ready to elevate your taco night?

Why Are These Tacos a Must-Try?
Simplicity at its finest: With just six ingredients, you can whip up these Crispy Baked Beef Tacos in a mere 35 minutes!
Savory goodness awaits: The flavorful combination of lean ground beef, rich taco seasoning, and melted cheese creates an unforgettable taste experience.
Versatile options galore: Think pulled chicken or even sautéed veggies—these tacos adapt to your cravings and are sure to impress everyone at the table!
Ideal for busy nights: Forget takeout—this easy recipe ensures you have a homemade meal ready quickly, perfect for your weeknight dinner rotation.
Crowd-pleaser potential: Serve them alongside salsa or guacamole, and watch your friends and family rave about their new favorite taco! Check out my Baked Bbq Chicken for another easy, flavorful dinner option.
Crispy Baked Beef Tacos Ingredients
For the Filling
• Lean Ground Beef – The main protein that provides a hearty filling; feel free to substitute with ground chicken or turkey for a lighter option.
• Taco Seasoning – Adds a robust flavor to the beef mixture; for a homemade touch, mix your own spice blend.
• Red Enchilada Sauce – Moistens the filling and adds tang; you can use green enchilada sauce for a fresh twist.
For Assembly
• Oaxaca Cheese (or Mexican Blend/Monterey Jack) – Melts beautifully, ensuring creamy goodness in each bite; cheddar also works well if you prefer it.
• Corn Tortillas – The perfect base for your tacos; consider flour tortillas for a different texture, but keep an eye on the baking time!
• Olive Oil – Helps achieve that crispy tortilla finish; any neutral oil is a suitable substitute.
Now that you have all the essentials for these Crispy Baked Beef Tacos, let’s get cooking!
Step‑by‑Step Instructions for Crispy Baked Beef Tacos
Step 1: Preheat the Oven
Begin by preheating your oven to 450°F (232°C). This temperature is crucial for achieving that perfect crispy texture in your Crispy Baked Beef Tacos. As the oven heats, gather your baking sheet and line it with parchment paper if you’re using aluminum, as this helps prevent sticking.
Step 2: Brown the Beef
In a medium skillet over medium-high heat, brown 1 pound of lean ground beef until it’s fully cooked, about 5-7 minutes. Use a wooden spoon to break up the meat as it cooks. Once browned, drain any excess grease to keep your tacos from becoming soggy. This lean beef will be the main flavor component of your tacos.
Step 3: Add Flavor with Seasoning
Stir in your taco seasoning and ½ cup of red enchilada sauce into the beef mixture. Allow it to simmer for about 3-5 minutes, stirring occasionally until everything is well combined and heated through. The sauce will add depth and moisture to the filling, elevating the taste of your Crispy Baked Beef Tacos.
Step 4: Prepare the Tortillas
While the beef mixture simmers, wrap your corn tortillas in a damp paper towel and microwave them for about 30-60 seconds. This step makes your tortillas pliable, preventing them from cracking when you fill and fold them for baking. Warm tortillas are key to achieving that delightful texture.
Step 5: Brush with Olive Oil
Once the tortillas are warm, take each tortilla and brush one side generously with olive oil. Place them oiled side down on your prepared baking sheet. This oil will help achieve that golden-brown crispiness while baking your Crispy Baked Beef Tacos to perfection.
Step 6: Fill the Tacos
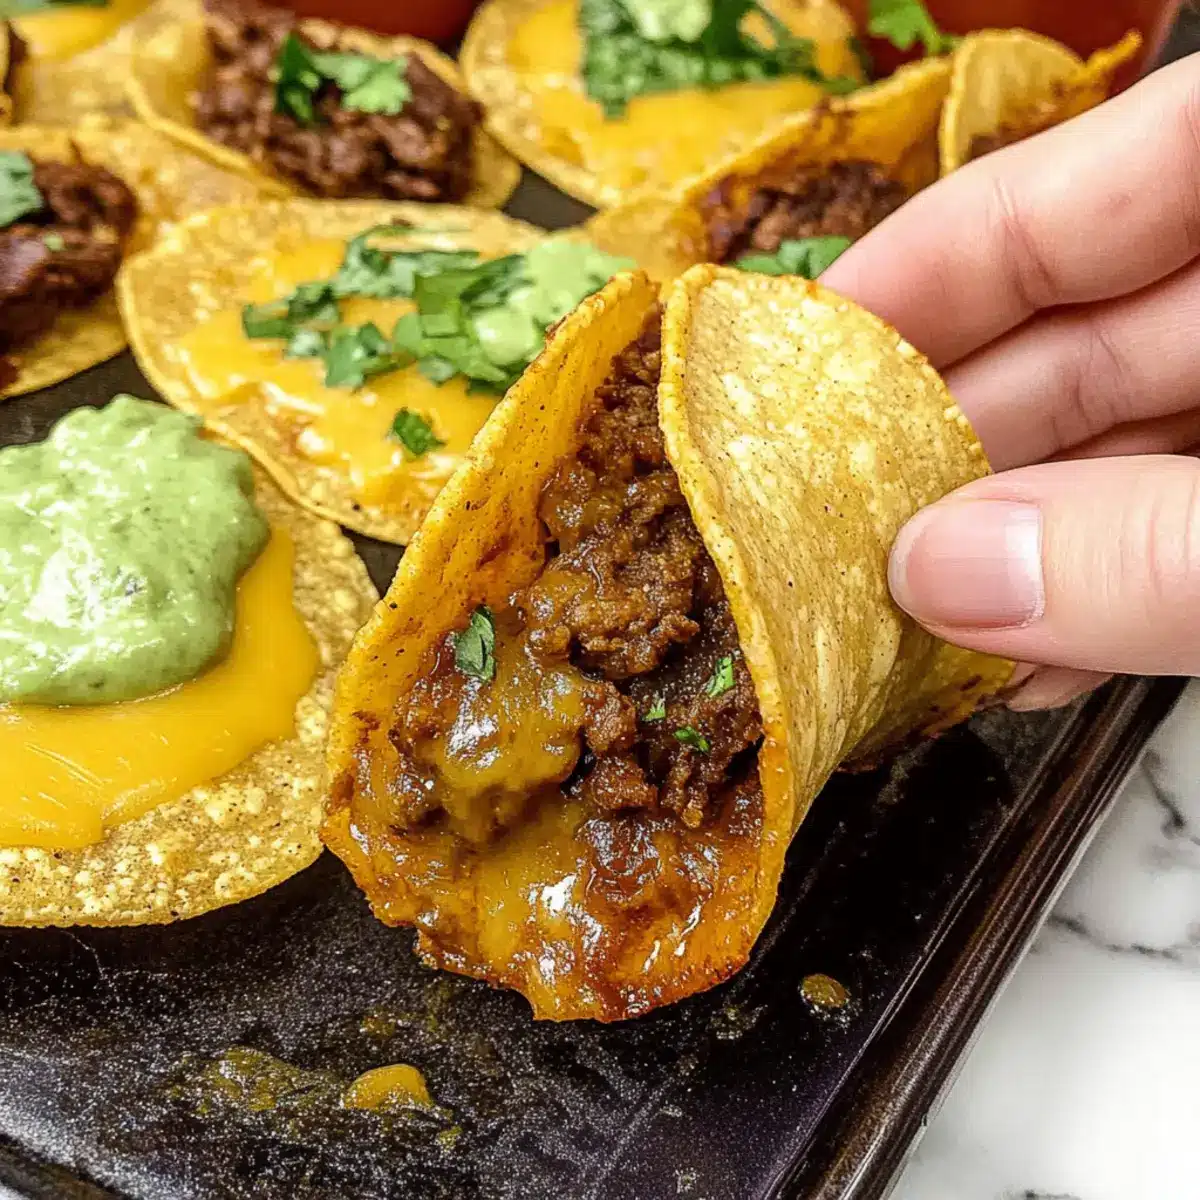
On one half of each tortilla, sprinkle a layer of cheese followed by the beef mixture, and then add another layer of cheese. Fold the tortillas over to create a half-moon shape. Make sure to pack the filling neatly for a balanced bite, ensuring every taco is filled with savory goodness.
Step 7: Bake to Crispy Perfection
Arrange the filled tortillas in a single layer on the baking sheet, ensuring they are not touching. Bake in the preheated oven for about 16 minutes, or until the tortillas turn golden brown and crispy. You’ll know they’re ready when the cheese is melted and bubbly, and the edges are delightfully crisp.
Step 8: Cool and Serve
Once baked, carefully remove the Crispy Baked Beef Tacos from the oven and let them cool for about 3 minutes. This short cooling period allows the cheese to set slightly, making them easier to handle. Serve warm with your favorite dips like salsa or guacamole for an extra tasty treat!

Expert Tips for Crispy Baked Beef Tacos
-
Don’t Rush the Heating: Ensure your tortillas are thoroughly warmed before filling to prevent cracks or tears, maintaining the integrity of your Crispy Baked Beef Tacos.
-
Mind the Oil: Apply a light but even brushing of olive oil on the tortillas. Too much can lead to sogginess, while too little won’t achieve that perfect crispy finish.
-
Avoid Overstuffing: Keep the filling quantity in check; overfilling tacos can lead to messy baking and difficulty in folding. A well-packed taco is a happy taco!
-
Use Proper Cookware: Baking directly on a nonstick or ceramic pan is ideal. If using aluminum, always line it with parchment to avoid sticking, which can ruin those crispy edges.
-
Cool for Best Results: Allow the tacos to cool briefly after baking. This helps the cheese set, making them easier to serve and more enjoyable to eat.
Variations & Substitutions for Crispy Baked Beef Tacos
Feel free to let your creativity shine and customize these delicious tacos to suit your taste buds!
- Chicken Delight: Swap ground beef for pulled chicken or shredded rotisserie chicken. It’s a lighter option with just as much flavor!
- Veggie Medley: Use sautéed bell peppers, onions, and black beans for a fulfilling vegetarian taco. This creates a delightful medley packed with nutrients!
- Cheese Lovers: Instead of Oaxaca, try pepper jack cheese for an added kick of spice. This small change elevates the flavor profile!
- Spice Up the Sauce: Replace red enchilada sauce with green for a fresh twist. The tanginess will surprise you with every bite.
- Flour Tortilla Upgrade: Try flour tortillas for a softer texture. Just reduce the baking time to 12-14 minutes for perfect results.
- Homemade Spice Joy: Create your own taco seasoning using cumin, paprika, and chili powder. The result is a unique taste that’s tailored to your liking!
- Snack Attack: Turn these tacos into bite-sized mini tacos, perfect for appetizers. Use smaller tortillas and enjoy them with your favorite dips.
- Fresh Herb Burst: Garnish with cilantro or green onions after baking. They add color and fresh flavor that brings everything together beautifully!
As you explore, consider pairing these tacos with a side of my delightful Baked Bbq Chicken for a complete family dinner that’ll leave everyone satisfied.
Make Ahead Options
These Crispy Baked Beef Tacos are ideal for meal prep, allowing you to savor homemade goodness even on the busiest nights! You can prepare the taco filling (lean ground beef mixed with taco seasoning and enchilada sauce) up to 3 days in advance. Just store it in an airtight container in the refrigerator. When you’re ready to serve, simply warm the filling in a skillet, microwave the corn tortillas for 30-60 seconds to ensure pliability, then assemble the tacos by brushing them with olive oil, adding cheese and filling, and baking as directed. This way, you’ll enjoy the same delightful crunch and flavor with less hassle!
How to Store and Freeze Crispy Baked Beef Tacos
Fridge: Store leftover Crispy Baked Beef Tacos in an airtight container for up to 3 days. To maintain crispiness, consider keeping the filling separate from the tortillas until ready to eat.
Freezer: If you plan to enjoy your tacos later, freeze the filling without the tortillas in a freezer-safe container for up to 3 months. When ready to eat, thaw in the fridge overnight and assemble before baking.
Reheating: To reheat, bake leftover tacos in a preheated oven at 350°F (175°C) for about 10-15 minutes or until warmed through, ensuring they regain some crispiness.
What to Serve with Crispy Baked Beef Tacos?
Elevate your taco night with delightful sides and drinks that complement each crunchy, savory bite.
- Guacamole: The creamy richness of guacamole perfectly balances the spiciness of the tacos, adding a fresh, buttery note.
- Mexican Street Corn: Charred corn tossed with lime, chili pepper, and cheese offers a sweet and zesty contrast that enhances the meal.
- Fresh Salsa: A vibrant blend of tomatoes, onions, and cilantro adds brightness to your plate, cutting through the savory richness of the beef.
- Cilantro Lime Rice: Fluffy rice infused with zesty lime and fresh cilantro makes for a refreshing side, complementing the Tex-Mex flavors of the tacos.
- Refried Beans: Creamy and savory, these beans provide heartiness and additional protein, rounding out the meal deliciously.
- Tortilla Chips with Queso: Perfect for dipping, crispy tortilla chips with melted cheese sauce are an addictive way to kick off your taco feast.
- Margaritas: A classic pairing, margaritas add a festive touch while their citrus notes enhance the overall meal experience.
- Churros: For dessert, these sweet, cinnamon-sugared pastries offer a delightful finish to your taco night that everyone will love!

Crispy Baked Beef Tacos Recipe FAQs
What type of beef should I use for the filling?
I recommend using lean ground beef for the filling, as it provides a hearty texture without excessive grease. If you’re looking for lighter options, ground chicken or turkey work beautifully!
How long can I store leftover Crispy Baked Beef Tacos?
Store your leftover tacos in an airtight container in the fridge for up to 3 days. For the best results, I suggest separating the filling from the tortillas to keep them crispy until you’re ready to enjoy them again.
Can I freeze the taco filling for later use?
Absolutely! To freeze, store the beef filling in a freezer-safe container for up to 3 months. Just allow it to thaw in the fridge overnight before assembling your tacos for baking. This makes for a super convenient meal prep option!
Why are my tortillas cracking when I fill them?
Cracking usually happens when the tortillas aren’t warm enough. I highly recommend wrapping them in a damp paper towel and microwaving them for 30-60 seconds before filling. This will soften them enough to prevent any cracks.
What can I do if I have allergies or dietary restrictions?
No problem! If you have dietary restrictions, consider using gluten-free corn tortillas and avoiding pre-packaged taco seasoning, which can contain allergens. You can easily make your own seasoning blend using spices like cumin, paprika, and chili powder.
How can I make these tacos vegetarian?
Very doable! Swap out the ground beef for sautéed vegetables, such as bell peppers, mushrooms, or zucchini, or you could also use refried beans for a protein-rich vegetarian option. Just season them well for that savory flavor!
Crispy Baked Beef Tacos for Easy, Flavorful Weeknight Dinners
Ingredients
Equipment
Method
- Preheat your oven to 450°F (232°C) and line a baking sheet with parchment paper.
- In a medium skillet, brown 1 pound of lean ground beef over medium-high heat for about 5-7 minutes.
- Stir in taco seasoning and ½ cup of red enchilada sauce; simmer for 3-5 minutes.
- Microwave corn tortillas wrapped in a damp paper towel for 30-60 seconds.
- Brush one side of each tortilla with olive oil and place oiled side down on the baking sheet.
- On one half of each tortilla, sprinkle a layer of cheese, then the beef mixture, followed by another layer of cheese. Fold over.
- Bake tortillas in the preheated oven for about 16 minutes until golden brown and crispy.
- Let the tacos cool for about 3 minutes before serving with salsa or guacamole.
Leave a Reply