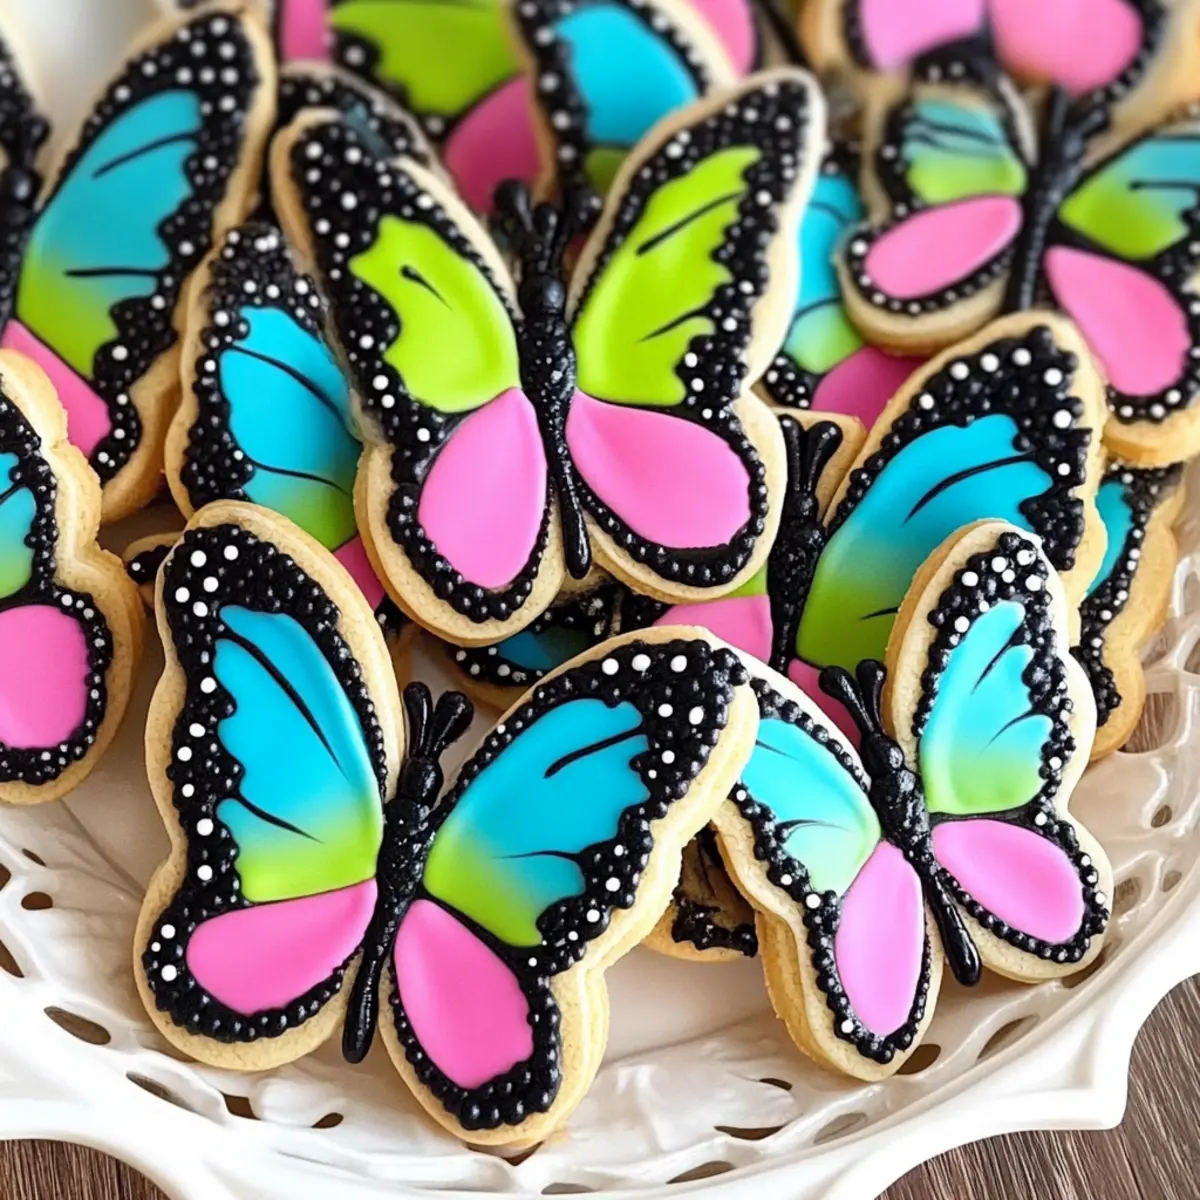
As I stood in my kitchen, a rainbow of gel colors sprawled before me, I felt that familiar excitement bubbling up. Today, I’m sharing my recipe for Simple Butterfly Cookies, where a classic vanilla sugar cookie base transforms into a canvas for vibrant royal icing designs. The joy of decorating these cookies not only satisfies your sweet cravings but also allows a spark of creativity to shine through. Whether for a spring celebration, a whimsical birthday party, or simply to brighten up a dull day, these cookies are a warm hug in dessert form and quick to make with minimal fuss. Ready to take flight into a world of color and flavor? Let’s dive in!
Why Love These Butterfly Cookies?
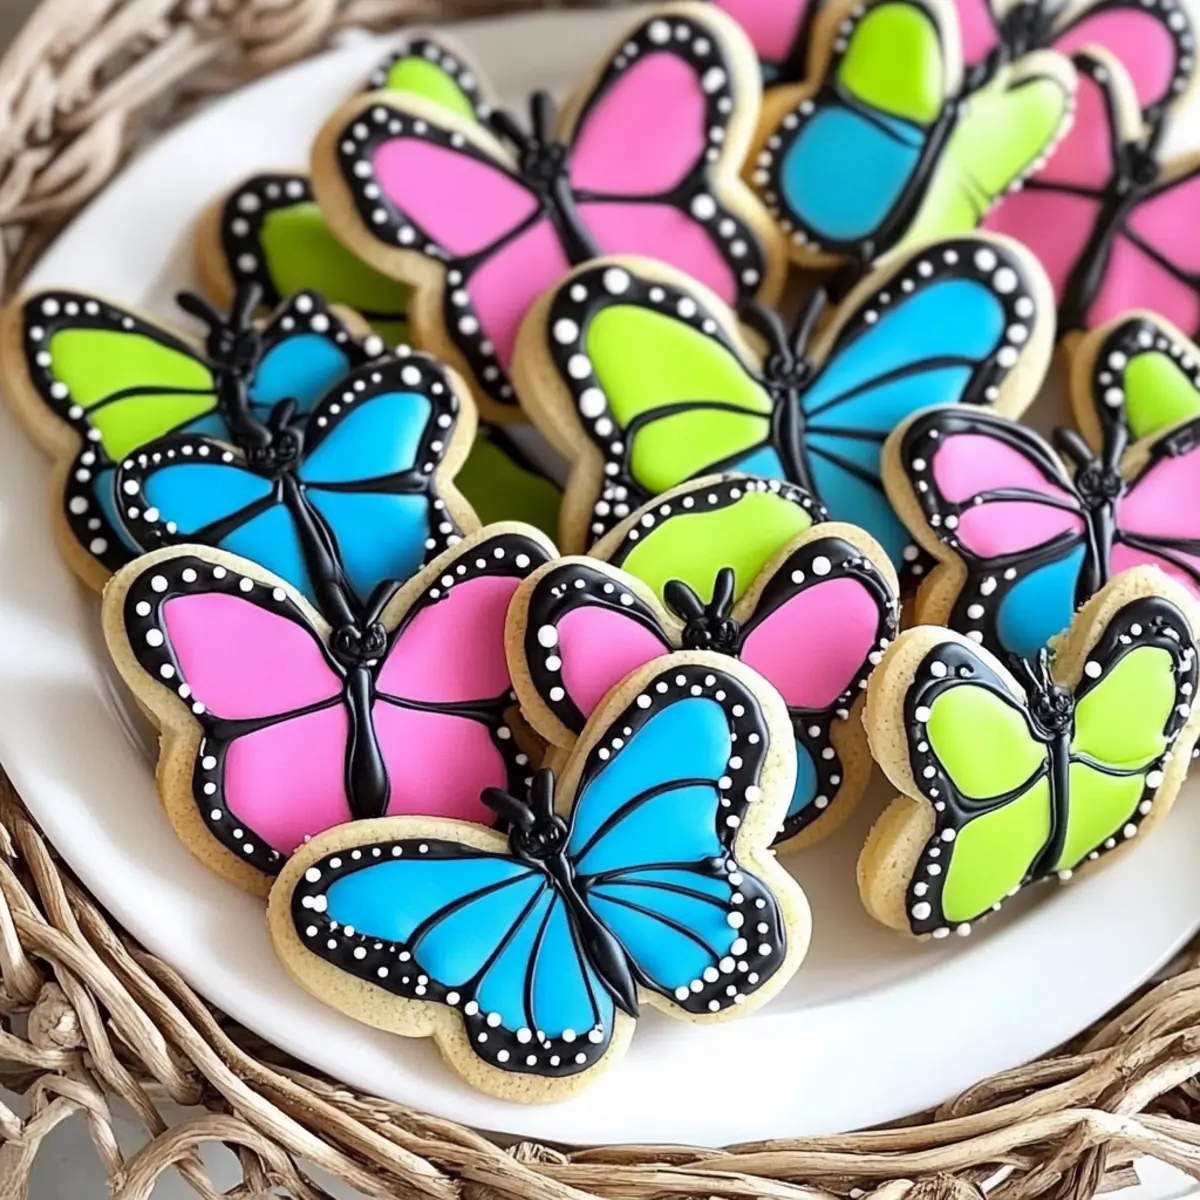
Colorful Creativity: Each cookie is a blank canvas for your imagination! Use different icing colors and patterns to make each butterfly uniquely yours.
Easy to Make: With a straightforward sugar cookie base and smooth royal icing, even novice bakers can create beautiful cookies quickly.
Versatile Design: Perfect for any occasion! From pastel spring themes to vibrant birthday parties, these cookies fit right in.
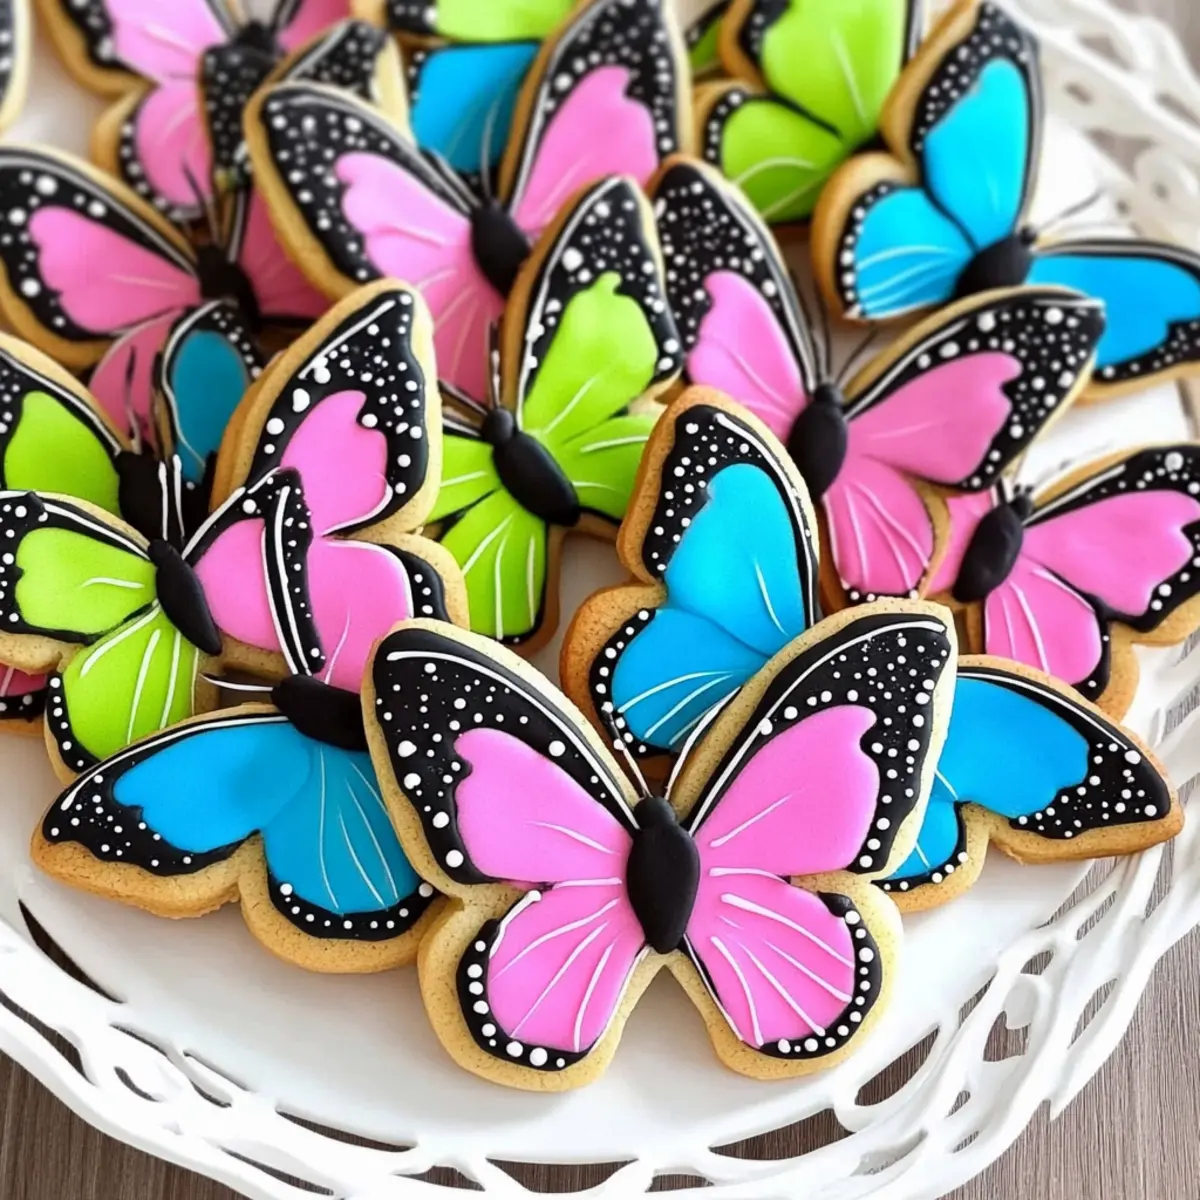
Impressive Presentation: Edible artistry that dazzles! Guests will admire your vibrant creations, making you the star of any gathering.
Perfect Family Activity: Involve kids or friends in the fun! Decorating these cookies is a delightful bonding experience for everyone involved.
Storage-Friendly: Make ahead and store in an airtight container; they remain fresh and delectable for days. Enjoy a quick treat whenever you need a sweet pick-me-up!
Simple Butterfly Cookie Ingredients
Unlock the delightful flavors and vibrant colors of your very own Simple Butterfly Cookies!
For the Cookies
- Vanilla Sugar Cookie Dough – Forms the sweet and tender base; you can easily swap for almond flavor for a twist!
For the Royal Icing
- Powdered Sugar – The main ingredient for royal icing, providing its sweetness and structure.
- Egg White or Meringue Powder – Essential for achieving a smooth icing that hardens beautifully; consider pasteurized egg whites for safety.
- Water – Adjusts icing consistency for easy piping and flooding.
For Decorating
- Gel Food Colors (Pink, Blue, Green) – Bring your cookies to life with vibrant hues; Americolor is a top choice for stunning results.
- Black Sanding Sugar – A fun optional topping that adds a crunchy texture and visual interest to your cookies.
With these ingredients in hand, you’re all set to create beautiful and whimsical Simple Butterfly Cookies that will surely delight everyone around you!
Step‑by‑Step Instructions for Simple Butterfly Cookies
Step 1: Prepare Cookie Dough
In a spacious mixing bowl, cream together softened butter and sugar until light and fluffy, about 3-5 minutes. Slowly add in your vanilla extract and mix well, then incorporate the flour in batches until a soft dough forms. Chill the dough for at least 30 minutes in the fridge to make rolling out easier and prevent spreading during baking.
Step 2: Cut Shapes
Once the dough is chilled, flour your work surface and roll out the cookie dough to approximately ¼ inch thick. Using butterfly-shaped cookie cutters, gently press down to cut out the shapes. Carefully lift each butterfly and place them onto a parchment-lined baking sheet, leaving enough space between each one for spreading.
Step 3: Bake Cookies
Preheat your oven to 350°F (175°C) while you prepare to bake. Place the baking sheets in the oven and bake the cookies for 10-12 minutes, or until the edges are lightly golden. Keep an eye on them as they bake; they should remain soft in the center. Once done, remove the cookies and let them cool on a wire rack.
Step 4: Make Royal Icing
In a clean mixing bowl, combine powdered sugar with egg whites (or meringue powder) and a splash of water. Using a hand mixer, beat the mixture until it reaches a stiff peak consistency. For decorating, adjust a portion of the icing to a “15-second” flooding consistency by adding small amounts of water until it flows smoothly but holds its shape on a spoon.
Step 5: Decorate Top Wings
Begin by outlining the top wings of your butterfly cookies with black royal icing, using a piping bag fitted with a fine tip. Let the outline dry for about 5 minutes until firm, then flood the wings with pink icing. Use a needle tool to create decorative swirls or patterns by dragging through the wet icing, adding a touch of fun to your Simple Butterfly Cookies.
Step 6: Decorate Bottom Wings
Repeat the decorating process for the bottom wings, this time using a contrasting color like blue. Outline with the blue icing and allow it to set for a few minutes before flooding the areas. Don’t forget to use the needle tool again to drag and form patterns that will make your butterflies look truly unique.
Step 7: Add Fine Details
Using white royal icing and a very fine piping tip, pipe small dots into the wet black icing at the corners of the wings. These dots add a lovely finishing touch to your Simple Butterfly Cookies, creating an elegant look. Allow the decorated cookies to dry for at least 1 hour or until fully set to avoid smudging.
Step 8: Finish Cookie Bodies
For the butterflies’ bodies, pipe black icing down the center of each cookie. While the icing is still wet, dip the bodies into black sanding sugar for a delightful texture. Let the cookie bodies dry completely before moving them to an airtight container, ensuring your Simple Butterfly Cookies are fresh and ready for any celebration!

Make Ahead Options
These Simple Butterfly Cookies are perfect for meal prep enthusiasts! You can prepare the cookie dough and chill it up to 24 hours in advance. Once ready to bake, simply roll, cut, and bake your cookies as instructed. The royal icing can also be made up to 3 days ahead; store it in an airtight container at room temperature to maintain its consistency. For optimal results, ensure to cover any icing exposed to air with plastic wrap to prevent crusting. When you’re ready to serve, simply decorate the cooled cookies and allow the icing to set—this ensures your cookies are just as delightful as if they were made fresh!
Expert Tips for Simple Butterfly Cookies
-
Royal Icing Consistency: Make sure your royal icing reaches that “15-second” flood consistency; this ensures smooth application and beautiful designs without runniness.
-
Chill Your Dough: Don’t skip chilling the cookie dough! It helps maintain the cookie shapes and prevents spreading during baking, resulting in perfectly formed butterflies.
-
Use Quality Food Colors: Invest in good gel food colors like Americolor, which provide vibrant hues that pop; poor quality may lead to dull or washed-out colors.
-
Patience in Drying: Allow sufficient drying time between icing layers. This step prevents colors from bleeding together and keeps your intricate designs intact.
-
Mess-Free Patterns: Wipe your needle tool between colors while decorating to keep your designs crisp and clean. Avoiding cross-contamination leads to stunning results!
-
Experiment with Design: Play with different color combinations and patterns. Every batch of Simple Butterfly Cookies can look distinct, making them a fun project for all occasions!
Storage Tips for Simple Butterfly Cookies
Room Temperature: Store cookies in an airtight container for up to 3 days to maintain freshness. Layer parchment paper between layers to prevent sticking.
Fridge: If you want to keep cookies for longer, refrigerate them in an airtight container for up to a week. Just allow them to come to room temperature before serving.
Freezer: Freeze decorated cookies individually wrapped in plastic wrap for up to 2 months. Thaw them in the fridge before enjoying your delightful Simple Butterfly Cookies.
Reheating: If you prefer a warm cookie, you can gently microwave them for 5-10 seconds. Avoid overheating, as it may soften the icing.
Simple Butterfly Cookies Variations & Substitutions
Feel free to play with flavors and colors to make these cookies your own masterpiece!
- Flavor Twist: Substitute vanilla extract with almond extract in the cookie dough for a delightful nutty flavor.
- Icing Alternatives: Use glaze icing instead of royal icing for a simpler, easier decorating experience.
- Color Palette: Try pastels for spring gatherings, or vibrant hues for festive parties, broadening the appeal of your cookies.
- Diverse Shapes: Switch up your cookie cutters to create flowers, hearts, or other fun shapes to mark special occasions.
- Texture Boost: Add crushed nuts or sprinkles into the cookie dough for an extra crunch and delightful surprises in every bite.
- Bold Contrast: Outline cookies in black, flooding the colors with striking reds or purples to elevate the design and drama.
- Spice It Up: Incorporate a dash of cinnamon or nutmeg into the cookie dough for a cozy, aromatic touch that complements the sweetness.
- Seasonal Themes: Decorate with seasonal motifs, like pumpkins or snowflakes, to make these cookies suitable for holiday festivities.
If you’re in the mood for a unique treat, check out Harvest Marble Cookies or the equally delightful Pecan Pie Cookies!
What to Serve with Simple Butterfly Cookies?
These charming cookies are a delightful addition to any gathering, inviting creativity and joy to your dessert spread.
- Fresh Fruit Salad: A light and refreshing fruit salad complements the sweetness of the cookies, adding a burst of natural flavor and color.
- Vanilla Ice Cream: Creamy vanilla ice cream creates a delightful contrast to the crisp texture of the cookies, perfect for a nostalgic pairing.
- Sparkling Lemonade: The zesty flavor of sparkling lemonade offers a bright, fizzy counterpart to these colorful treats, enhancing their festive flair.
- Chocolate Dipped Strawberries: The rich chocolate surrounding luscious strawberries provides a decadent contrast that beautifully balances the sweetness of the cookies.
- Fruit-Infused Water: Refreshing and light, infuse water with slices of lemon, lime, or berries for a vibrant, thirst-quenching beverage that complements any dessert.
- Whipped Cream Topping: Serve your cookies with a dollop of freshly whipped cream for a delicious, airy accompaniment that adds a touch of elegance.
- Kids’ Punch: A fruit-flavored punch with fun decorations elevates any party atmosphere, making it a perfect pairing for playful butterfly cookies.
- Chocolate Milk: A nostalgic favorite, chocolate milk brings a creamy sweetness that kids (and adults!) will love alongside these lovely cookies.
Simple Butterfly Cookies Recipe FAQs
How do I select the best ingredients for my cookies?
Absolutely! Freshness is key. For the vanilla sugar cookie dough, make sure your butter is unsalted and at room temperature for easy creaming. When it comes to the gel food colors, look for quality brands like Americolor to ensure vibrant and true colors. For the royal icing, opt for fresh powdered sugar without lumps for a smooth texture.
How should I store my Simple Butterfly Cookies?
To keep your cookies fresh, store them in an airtight container at room temperature for up to 3 days. For longer storage, popping them in the fridge will extend their life to about a week. Just remember to bring them back to room temperature before serving! Layer parchment paper between stacked cookies to prevent them from sticking together.
Can I freeze my Simple Butterfly Cookies?
Yes! To freeze your decorated cookies, wrap each cookie individually in plastic wrap and place them in an airtight container or a heavy-duty freezer bag. They can be stored in the freezer for up to 2 months. When you’re ready to enjoy them, simply thaw them in the fridge overnight for the best results.
What should I do if my royal icing is too runny?
If your royal icing is too runny, don’t panic! Here’s what to do: gradually add more powdered sugar until you achieve the desired “15-second” flooding consistency. This means when you drizzle it back into the bowl, it should take about 15 seconds to smooth out. If it’s too thick, add a tiny bit of water, but do so very carefully!
Are there any dietary considerations I should be aware of?
While these cookies do not have specific dietary restrictions, they contain egg whites in the royal icing. If egg allergies are a concern, you can use meringue powder as an alternative, which can be safely used for royal icing. Also, if making them for a gathering, consider labeling them to inform guests about the ingredients!
Delightfully Simple Butterfly Cookies for Spring Celebrations
Ingredients
Equipment
Method
- In a spacious mixing bowl, cream together softened butter and sugar until light and fluffy, about 3-5 minutes. Slowly add in your vanilla extract and mix well, then incorporate the flour in batches until a soft dough forms. Chill the dough for at least 30 minutes in the fridge.
- Flour your work surface and roll out the cookie dough to approximately ¼ inch thick. Using butterfly-shaped cookie cutters, gently cut out the shapes and place them onto parchment-lined baking sheets.
- Preheat your oven to 350°F (175°C). Bake the cookies for 10-12 minutes, until the edges are lightly golden. Remove and let cool on a wire rack.
- In a clean mixing bowl, combine powdered sugar with egg whites (or meringue powder) and a splash of water. Beat until stiff peaks form. Adjust a portion of the icing to a “15-second” consistency.
- Outline the top wings of your butterfly cookies with black icing using a piping bag. Let dry for about 5 minutes, then flood the wings with pink icing. Use a needle tool to create patterns.
- Repeat the outlining and flooding for the bottom wings using blue icing, creating unique patterns.
- Pipe small dots of white icing into the corners of the black icing for finishing touches. Let cookies dry for at least 1 hour until fully set.
- For the cookie bodies, pipe black icing down the center and dip into black sanding sugar while wet. Allow to dry completely before storing.
Leave a Reply