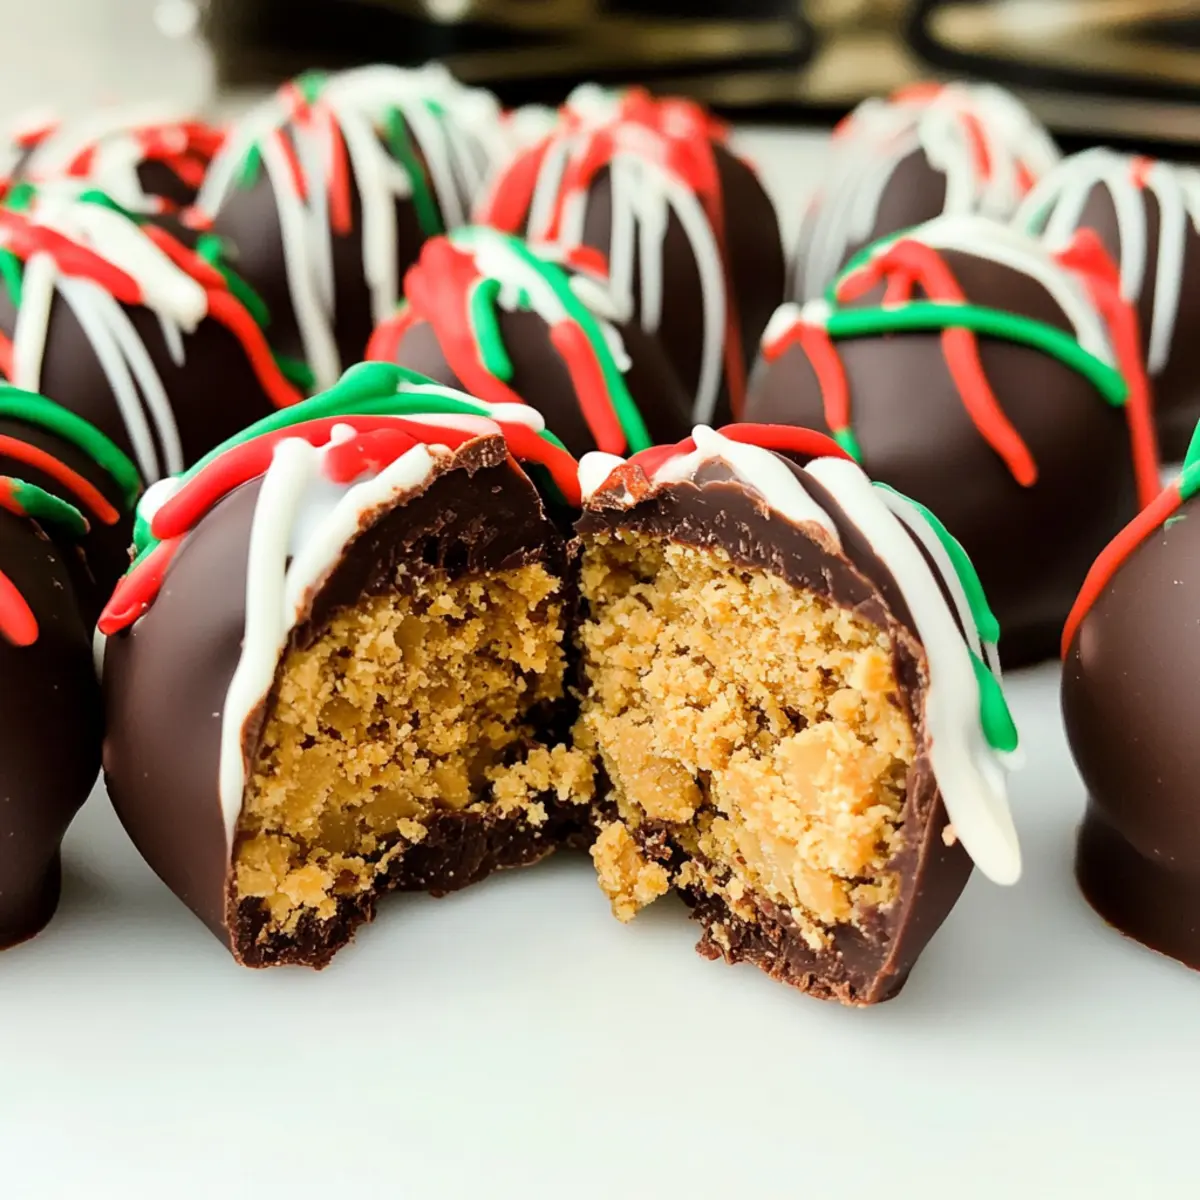
The kitchen was abuzz with laughter and the sweet scent of chocolate melting—my heart couldn’t help but swell with joy. As the holidays approach, I find myself drawn to making treats that create both warmth and connection, like these Christmas Peanut Butter Crunch Truffles. This no-bake delight perfectly balances creamy peanut butter with a satisfying crunch, making it a standout on any dessert table. Best of all, they’re a breeze to whip up, requiring minimal ingredients and effort! Whether you’re looking to impress at holiday parties or create edible gifts that friends and family will cherish, these truffles promise to be a crowd-pleaser. Ready to dive into the world of festive flavors and simple steps? Let’s make some magic in the kitchen together!
Why Are These Truffles So Irresistible?
Effortless Preparation: These Christmas Peanut Butter Crunch Truffles are a breeze to make, requiring no baking and just a few simple ingredients. Deliciously Decadent: The rich peanut butter and silky chocolate coating create a mouthwatering treat that’s hard to resist. Textural Delight: Enjoy the blissful combination of creamy centers and crunchy exteriors that keep every bite exciting. Perfect for Gifting: Present them in decorative boxes as festive gifts; they are sure to delight anyone who receives them! For more holiday confections, check out our Christmas Sugar Cookie Bites and Soft Christmas Peppermints. Holiday Essential: No holiday dessert table is complete without these crowd-pleasers that everyone will love!
Christmas Peanut Butter Crunch Truffles Ingredients
For the Truffles
• Graham Cracker crumbs – Adds texture and a sweet, crunchy base; use about 10 full sheets for crushing.
• Peanut Butter – Provides creaminess and a strong peanut flavor; choose smooth or crunchy based on your preference.
• Rice Krispie Cereal – Introduces additional crunch and lightness to the truffles, making the texture even more delightful.
• Powdered Sugar – Sweetens the mixture and binds the ingredients together; adjust the amount to taste for your ideal sweetness.
• Butter – Softened to help incorporate the mixture smoothly; it’s key to a well-blended truffle.
For the Coating
• Ghirardelli Dark Chocolate Melting Wafers – Use these for coating; they add a rich chocolate flavor that perfectly complements the peanut butter.
• Candy Melts (red, white, green) – For decoration; these vibrant colors enhance the festive look of your Christmas Peanut Butter Crunch Truffles.
Get ready to indulge in these delightful treats that will surely bring smiles this holiday season!
Step‑by‑Step Instructions for Christmas Peanut Butter Crunch Truffles
Step 1: Crush the Graham Crackers
Begin by crushing approximately 10 sheets of Graham Crackers using either a rolling pin or a food processor. Aim for a fine crumb consistency that resembles sand, which will create a sweet and crunchy base for your Christmas Peanut Butter Crunch Truffles. This process should take about 5 minutes, ensuring that no large pieces remain.
Step 2: Mix the Truffle Base
In a large mixing bowl, combine the crushed Graham Crackers with peanut butter, softened butter, and powdered sugar. Use a spatula or your hands to blend the mixture until it’s thoroughly combined and smooth—this should take around 3-5 minutes. You want the mixture to feel cohesive and slightly sticky, perfect for shaping into truffle balls later.
Step 3: Add the Rice Krispie Cereal
Gently fold in the Rice Krispie Cereal to the peanut butter mixture until it is evenly distributed. This step should take about 2 minutes and will add that delightful crunch to your truffles. Ensure that the cereal is not over-mixed to maintain its crunchy texture, which balances the creamy filling beautifully.
Step 4: Chill the Mixture
Cover the mixture with plastic wrap and refrigerate for about 30 minutes. This helps the truffle mixture firm up, making it easier to shape into balls. After chilling, the mixture should be slightly firmer but still moldable, allowing you to work with it comfortably.
Step 5: Form the Truffles
After chilling, scoop the mixture and roll it into 1-inch balls. This recipe should yield around 20 truffles, so aim for uniform sizes for even coating later on. Place the rolled truffles on a parchment-lined baking sheet, and chill them in the refrigerator for an additional 2 hours to set.
Step 6: Melt the Dark Chocolate
While the truffles chill, melt the Ghirardelli Dark Chocolate Melting Wafers using a microwave-safe bowl. Heat in 30-second intervals, stirring in between, until smooth and glossy—this should take about 1-2 minutes. Be cautious not to overheat; the chocolate should be fully melted but not boiling.
Step 7: Coat the Truffles
Using a fork or skewer, dip each chilled truffle into the melted chocolate, ensuring they are fully coated. Allow any excess chocolate to drip off before placing them back on the parchment-lined baking sheet. The chocolate should look shiny and thick, indicating a perfect coating for your Christmas Peanut Butter Crunch Truffles.
Step 8: Set the Chocolate Coating
Place the chocolate-coated truffles in the refrigerator for about 30 minutes, or until the chocolate has completely hardened. This gives the truffles a beautiful, smooth finish and makes them easier to handle for the next step.
Step 9: Decorate with Candy Melts
Melt the colorful Candy Melts in separate Ziploc bags by microwaving them in 30-second increments until fully melted. Carefully cut a tiny tip off each bag and drizzle the melted candy over the set truffles for a festive touch. The bright colors will not only enhance the presentation but also add to the holiday spirit of your Christmas Peanut Butter Crunch Truffles.
Christmas Peanut Butter Crunch Truffles Variations
Feel free to get creative with these Christmas Peanut Butter Crunch Truffles and make them your own!
-
Nut Butter Switch: Use almond butter or cashew butter for a different flavor profile that still delights. Each nutty option brings a unique twist to the classic truffle!
-
Add Some Spice: Sprinkle in a pinch of cinnamon or nutmeg for a warm, fragrant flavor that’s perfect for the holidays. It’s a subtle, yet festive addition that will elevate each bite.
-
Coating Choices: Swap the dark chocolate with milk or white chocolate for a sweeter, creamier finish. Each type of chocolate adds its own charm—try them all and see which you prefer!
-
Coconut Flakes: Roll your truffles in shredded coconut instead of crushed graham crackers for an exotic touch. The coconut adds a chewy texture that pairs beautifully with the creamy filling.
-
Festive Sprinkles: Top your truffles with colorful sprinkles or crushed peppermint candies for a joyful holiday look. This adds not just visual appeal but also a delightful crunch!
-
Crunchy Add-ins: Incorporate finely chopped nuts or toffee bits into the mixture for an additional textural element. This can enhance the crunch while adding an unexpected flavor twist.
-
Chocolate Drizzle: Instead of using colored candy melts, drizzle some melted chocolate on top for a more elegant look. The rich chocolate cascades enhance the overall flavor delightfully.
-
Fruity Surprise: Toss in some mini chocolate chips or dried cranberries to the mixture for a sweet surprise in each bite. This fruity addition gives a beautiful contrast to the nutty flavors.
By exploring these variations, you can turn the classic Christmas Peanut Butter Crunch Truffles into something completely new. Don’t forget, if you’re in the mood for more festive treats, be sure to check out our delicious Christmas Spice Buttercream to pair or even decorate your truffles!
Expert Tips for Christmas Peanut Butter Crunch Truffles
-
Consistent Size: Use a food scale to weigh your truffle mixture when forming balls. This ensures even coating and a professional look for your Christmas Peanut Butter Crunch Truffles.
-
Control Drizzling: When melting the Candy Melts, cut only a small tip off the bag for precise control during drizzling. This helps create beautiful, festive designs on your truffles.
-
Cooling Time: Be patient during chilling steps; allowing enough time between forming and coating helps avoid melted chocolate. Proper cooling maintains the texture of your truffles.
-
Avoid Overmixing: Carefully fold in the Rice Krispie Cereal without overmixing. This preserves the crunchy texture that adds delightful contrast in every bite.
-
Experiment with Flavors: Want to switch things up? Try substituting almond butter for peanut butter for a unique twist in flavor while keeping the ease of this no-bake holiday treat.
Storage Tips for Christmas Peanut Butter Crunch Truffles
Fridge: Store your truffles in an airtight container in the refrigerator for up to 1 week to maintain their freshness and flavor.
Freezer: For longer storage, freeze the truffles in a single layer on a baking sheet for 1 hour. Then, transfer them to a freezer-safe container for up to 3 months.
Thawing: When ready to enjoy, simply transfer the truffles to the fridge and allow them to thaw for a few hours before serving.
Reheating: These no-bake Christmas Peanut Butter Crunch Truffles are best enjoyed cold, so there’s no need to reheat!
What to Serve with Christmas Peanut Butter Crunch Truffles
As you prepare to share your delightful truffles, consider these complementary dishes that enhance the festive flavors and textures.
- Rich Hot Chocolate: The silky smoothness of hot chocolate serves as a cozy drink pairing, amplifying the chocolate experience while warming your heart.
- Fluffy Whipped Cream: Adding a dollop of fresh whipped cream brings a light, airy texture that nicely contrasts the truffles’ richness.
- Nutty Biscotti: Crunchy biscotti pairs beautifully with the creamy center of the truffles, creating an enjoyable textural contrast with every bite.
- Decadent Chocolate Cake: For a more indulgent dessert, a slice of chocolate cake enhances the chocolate flavor while adding a moist, rich texture to each serving.
- Festive Fruit Platter: A vibrant mix of seasonal fruits like pomegranate, oranges, and berries provides a refreshing balance to the rich truffles and adds a pop of color to your table.
- Sparkling Cranberry Juice: This non-alcoholic beverage adds a tart and refreshing sparkle, perfectly complementing the sweetness of your Christmas Peanut Butter Crunch Truffles.
- Peppermint Tea: A warm cup of peppermint tea promotes a soothing finish to your sweet treat, cleansing your palate with its refreshing minty flavor.
- Chocolate Drizzled Popcorn: For a fun and shareable snack, lightly salted popcorn with a drizzle of chocolate mirrors the truffle experience.
- Gingerbread Cookies: These spiced cookies bring a warm, festive aroma, delightfully pairing with the nutty flavors of the truffles and embodying the spirit of Christmas.
- Vanilla Ice Cream: Creamy vanilla ice cream provides a cool, smooth counterpoint, enhancing the overall dessert experience in a delightfully rich way.
Make Ahead Options
These Christmas Peanut Butter Crunch Truffles are perfect for busy home cooks looking to simplify their holiday baking! You can mix the truffle base (crushed Graham Crackers, peanut butter, softened butter, and powdered sugar) up to 24 hours in advance. Simply refrigerate the mixture, tightly covered, to maintain freshness and prevent browning. When you’re ready to make the truffles, fold in the Rice Krispie Cereal, form them into balls, and chill for an additional two hours. After the truffles are rolled, they can be coated in melted chocolate and decorated at least 3 days before serving, ensuring they’re just as delicious when it’s time to share them at your festive gathering. Enjoy stress-free holiday entertaining with these delightful treats!
Christmas Peanut Butter Crunch Truffles Recipe FAQs
How do I choose the right peanut butter for the truffles?
Absolutely! For these truffles, you can use either smooth or crunchy peanut butter. Smooth peanut butter creates a creamy texture, while crunchy peanut butter adds delightful little bits of peanut that enhance the overall experience. I often prefer smooth for a more straightforward flavor, but the more the merrier if you like the crunch!
How should I store the truffles?
To keep your Christmas Peanut Butter Crunch Truffles fresh, store them in an airtight container in the refrigerator for up to 1 week. Be sure to separate layers with parchment paper to prevent sticking. If you want to keep them longer, consider freezing them!
Can I freeze the truffles, and if so, how?
Yes! For freezing, place the truffles in a single layer on a baking sheet and freeze for about 1 hour. After they’re firm, transfer them to a freezer-safe container or zip-top bag, keeping them airtight. They can be stored in the freezer for up to 3 months! When you’re ready to enjoy, simply move them to the fridge to thaw for a few hours.
What do I do if my chocolate coating is too thick?
Very! If your chocolate coating is thick or clumpy, it’s likely due to overheating when melting. To fix this, add a teaspoon of vegetable oil or shortening to the chocolate while melting to thin it out. Stir well to combine until you reach a smoother, more manageable consistency for dipping your truffles.
Are these truffles safe for people with nut allergies?
If you’re concerned about nut allergies, it’s best to avoid these truffles since peanut butter is a key ingredient. Instead, you might try using sunbutter or another nut-free alternative that mimics the texture and taste, ensuring everyone can enjoy them during the holidays!
Irresistible Christmas Peanut Butter Crunch Truffles to Delight
Ingredients
Equipment
Method
- Crush approximately 10 sheets of Graham Crackers using a rolling pin or food processor until fine crumbs remain.
- In a large mixing bowl, combine crushed Graham Crackers, peanut butter, softened butter, and powdered sugar until smooth and cohesive.
- Gently fold in the Rice Krispie Cereal until evenly distributed, ensuring not to over-mix.
- Cover the mixture with plastic wrap and refrigerate for about 30 minutes to firm up.
- Scoop the mixture and roll into 1-inch balls, then place on a parchment-lined baking sheet and chill for another 2 hours.
- Melt the Ghirardelli Dark Chocolate Melting Wafers in a microwave-safe bowl in 30-second intervals until smooth.
- Dip each chilled truffle into the melted chocolate, allowing excess to drip off before placing back on the baking sheet.
- Refrigerate the chocolate-coated truffles for about 30 minutes until the chocolate hardens.
- Melt the colorful Candy Melts in separate Ziploc bags and drizzle over the set truffles for decoration.
Leave a Reply